
This is 'Try something new...', a series of articles encouraging you to get out there and, as you may have guessed, try something new. What that thing is may vary wildly, sometimes we will be well experienced and other times we will be a beginner trying it for the first time just like you! Let us take a look at the fundamentals of learning guitar, an adventure in its own right and one perfectly suited for the icy winter months...
Today I want to lay out the basics of playing the guitar, whether you already have a guitar and are struggling to know where to start, or are just considering taking up an instrument and want to know what road lays ahead of you then this guide should be pretty exhaustive. Learning to play the guitar or any instrument for that matter can be a daunting task - you're handed a slab of wood with strings and dots and (usually) no instruction manual comes in the pack. If you aren't sure you are going to stick with it then putting money into lessons right from the off can seem a bit of a waste, especially to learn the fundamentals. When learning to drive a car my dad insisted on teaching me everything about how to operate it because he said, quite rightly, "it is a waste to pay someone just to teach you how to use a clutch and turn the wheel, I'll teach you to drive a car and your instructor can teach you to pass the test"; let us see if I can get you the fundamentals nailed down and get you excited about playing the guitar, then we can pass you on to an expert who can take you all the way to expert level.
What's everything called and which bits are important?

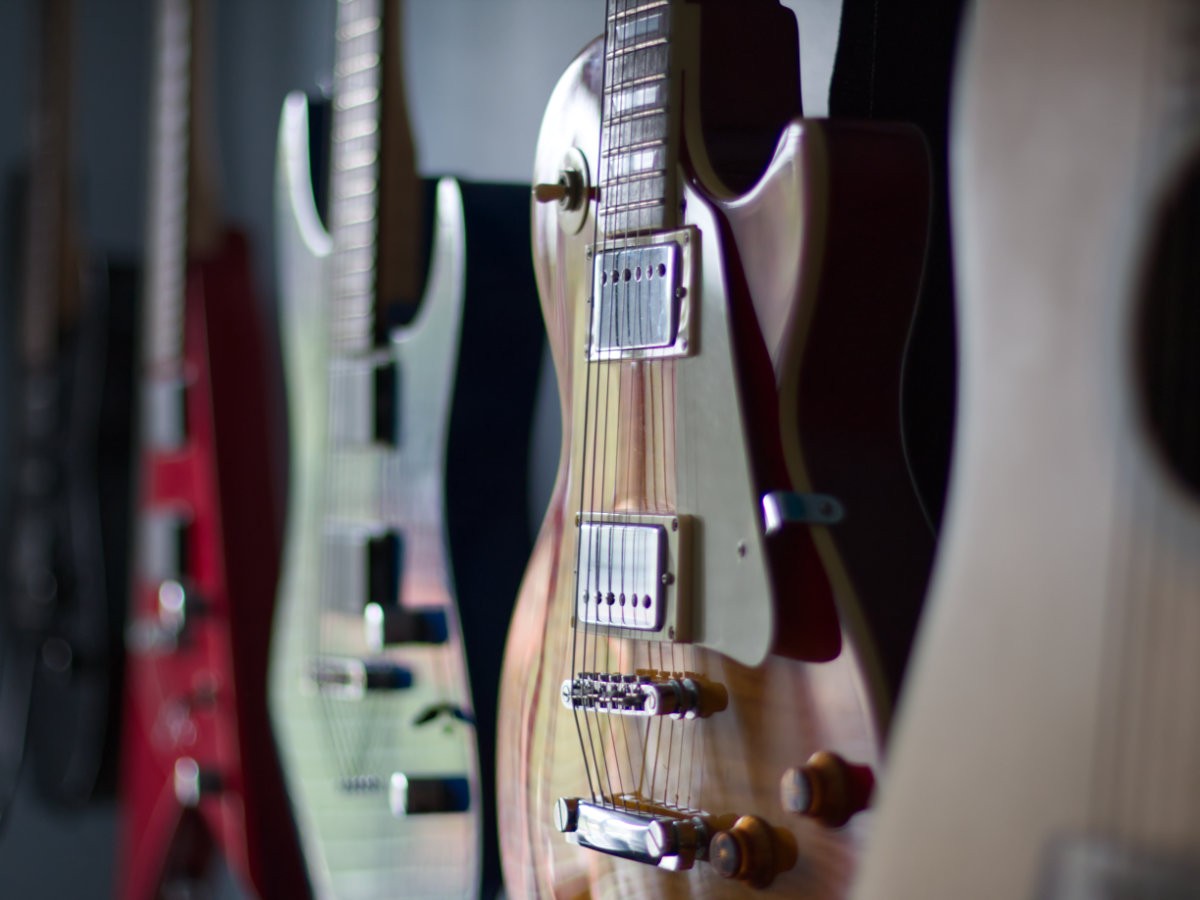
Let's start right at the very basics, and discuss the parts of the guitar, the image above is a labelled diagram of the key parts of the guitar - I've labelled everything above but let's talk about some of the most important bits from the perspective of a player. Firstly, the overall shape of the first guitar is close to a Fender Stratocaster, sometimes known as a Strat-style, s-type, Super-Strat and more depending on the configuration; there are many different body styles that generally result in subtle differences to tone and playing, the only exception being certain more excentric shapes, such as V-shaped, can be difficult to play sitting down. The second guitar is based on a Les Paul popularised by Gibson and the final guitar is acoustic. Obviously, acoustic guitars are a different beast altogether, often with a much larger body as the sound is determined by the cavity of the guitar itself the shape of the guitar will have a much larger impact on the sound. Some guitars have comfort carves, or a "belly cut", on the back of the guitar and an arm contour on the front which can both make the guitar feel more comfortable to play. The shape is a difficult thing to recommend over the internet, if possible going to a guitar store and playing at the very least a Stratocaster style guitar and a Les Paul style guitar will give you a quick taste of some of the body differences - play as many as you can to get a feel for what you like. Ultimately, the main take away here is shapes change, features are not included on every kind of guitar but as far as playing is concerned things do not change much.
To begin we will look at the fretboard, the area you are likely to be focusing on a lot as you learn. The fretboard sits on the neck and has a bunch of metal bumps on it called frets. When playing the guitar, you will want to push the string down in the gap between each fret to play a note - this does not require too much pressure so have a play around and get a feel for this. You can play string without holding it down anywhere, this is called an open-note or the 0 (zero) fret. Typically, guitars will have somewhere 22-24 frets on electric and 15ish accessible frets on acoustic. The distance the strings sit above the frets will have a dramatic impact on both the sound and the playability of the guitar but we will talk about that more when we discuss guitar set-up later on.
Now, let us jump to the top of the guitar at the headstock, where the machine-heads sit - these are where you will retune your guitar and they can come in a variety of styles which can also be locking. The strings immediately join the fretboard by passing through the nut, this can also be locking (typically if you have a Floyd Rose set-up, which I will discuss at the bridge section). There isn't too much to worry about here and while different types may change how you do certain things (like re-tuning or restringing your guitar), there is plenty of advice online on how to do this for just about every possible configuration. There are some very different guitar styles, including ones which do not have a head at all and have tuners at the opposite end of the body, but I am going to assume that as a beginner it is incredibly unlikely you will buy one of these guitars (you are unlikely to find one of these at the affordable end of guitars).
Follow the strings down from the headstock all the way to where they disappear, this will put you near the bridge - bridges can come in many different configurations, with the two most common being a whammy/vibrato/tremolo system (which can vary in appearance and is sometimes referred to by brand names such as Floyd Rose or Bigsby) and a hard-tail (Like a Les Paul, the strings go into a block and stop there) or String-through (quite literal, the strings go through the body) system. The tremolo system will have what is known as a whammy bar connect to it, that will allow for shifting the pitch of the currently played note - tremolos are usually great fun to play with but can often come at the cost of tuning stability, which is why you may find those aforementioned locking systems added to the guitar. Hard-tails and Through-body designs offer no such feature, so it may seem like a tremolo is a no-brainer as "more features = better", but there are considerations to be made especially if you are buying an affordable guitar...
A few notes on buying your first guitar and how it is set-up
So you are looking to buy your first guitar, you have a vague understanding of everything above and you have a bit of cash in hand - what should you buy? Well, I'm going to assume that (relative to what guitars can cost) you are planning to not spend a lot - maybe under £200. If that is the case, the only real advice I have for you is trying to avoid tremolo systems if you do not expect to need one, in this price range they can be very hit and miss and the end result may be a guitar that refused to hold tuning. Nothing will put you off guitar faster than constantly having to retune your guitar, but if your favourite artists use one or you are a sucker for those 80's style dive-bomb filled solos and must have a tremolo, then check reviews carefully before you buy. Many retailers now do all-in-one kits that include pretty much everything you will need to get started, these are a great option if you literally have no idea where to begin and just want to jump in and play!
I would say the most common affordable guitar will be a strat-like guitar that will include a tremolo system and in recent years these cheaper options are getting better and better, they are certainly nothing like the bargain-bucket guitars I grew up with that lost tuning every time you looked at them. If you want a balance of solid and affordable, look into brands like Yamaha, Squier, Jackson, Ibanez etc. The well-known manufacturers are often producing high-quality affordable kit, especially if you do not wish to gamble on an unknown Chinese manufacturer.
Above all else, anything you buy will almost certainly benefit from a good set-up; most mom-and-pop stores I have encountered over the years will throw in a set-up on everything they sell so find out if they do and take advantage of that, even if they don't it'll be worth paying to get your guitar playing right from day 1.
You may be tempted into picking up a better guitar for less money by buying second hand and I say go for it, but be aware of the pitfalls! Second-hand guitars can be an excellent way to get a near-mint instrument for a chunk of change less than when new, but that only works if you know what to look for. You will need to look a guitar over with a keen eye and play it thoroughly to know if it is a good purchase or not, and as you are likely to be brand new to the guitar you probably don't know how a guitar should feel let alone be able to spot these problems. If you go second-hand, get one from a reputable seller with a good returns policy and get it checked over as soon as possible. If you cannot get anyone more knowledgable than yourself to check a guitar over then I would air on the side of caution and not go used at all, at least until you are a little more experienced, but if you must go forwards then here is a list of quick things you can check to spot potential issues:
- Is the action high? The action is the distance between the fretboard and the strings, if the strings sit too high then it can make the guitar difficult to play, especially as a beginner, too low and you will end up with a buzzing sound as you pay where the strings rattle against the frets.
- Speaking of buzz, is there any? Play up and down each string and listen closely for a rattly buzz coming from your fretboard.
- Is the fretboard generally clean? If the guitar hasn't been looked after then it can accrue a grungy build-up on the fretboard. This is not a problem on its own but may be indicative of poor maintenance
- Are the frets themselves nice and clean looking, free of scratches and dents and do they stand proud from the fretboard? Without prior knowledge, it can be difficult to judge what a fret should look like, but if the frets are particularly unhealthy you will probably get some of that aforementioned buzz
- Does every part of the guitar feel secure, do the strap buttons sit in the body firm or do they move? Are all of the machine-heads straight? Look all around for any damage that wasn't disclosed at the point of sale. A little body damage is not something to worry about, but if it impacts the playability then it will need to get fixed
- Visually inspect all over for any potential repairs. As long as a repair has been done well then it may not be a problem but it should have been disclosed at the point of sale. Certain brands are more prone to certain breaks than others (For example, Gibson Les Paul guitars tend to break near the headstock if the previous owner was a little careless with it and a professional repair can be tricky to spot)
- Do all of the electronics work? Are there any crackles and pops as you change settings? Switch between all of the pickup settings and try all the knobs to ensure everything works as expected
- Place the guitar on the ground and look straight down the neck of the guitar from the headstock towards the body and look at the fretboard, it will have a radius to it but we are actually looking at the flatness of the neck (think from the side-profile). Does it look flat or near flat? Or does it bulge around the middle? It may not be perfectly flat (in fact, flat may not be the desirable set-up) but as long as it looks reasonably close this is acceptable...
- Your guitar's neck will typically have a truss rod running the length of it, normally accessible via a little opening on the headstock, possibly with a plastic cover (google is your friend here - this can vary manufacturer to manufacturer). Pop this open, and you should be able to see what looks like a nut that is threaded onto something - can you see much thread? If the thread is sticking out quite far beyond the lip of the nut then there is a chance the truss rod is 'maxed' which can make future adjustments difficult
- Back to looking down the neck, does it twist at all? We are now looking for left/right rotation, you should be able to see the nut and the bridge, as long as they are roughly aligned you should be fine.
The above problems are listed, debatably, from lowest concern to highest, with the first few most likely fixable by a good service whereas the latter ones should probably result in a return to the seller. I would also say that this list is probably incomplete and what you determine to be a deal-breaker may be different from me, but personally, if I were to find anything that wasn't shown when sold to me I would treat it as an indicator that there may be other problems I haven't picked up on yet and just get my money back. As one final generalisation, a lot of the problems I am describing here would apply more to older guitars than newer ones and if you are buying new/nearly-new the odds of you encountering a problem are much smaller - I have bought second-hand guitars in the past and they have become some of my favourite players so don't let this dissuade you from ever buying second-hand, just be aware that as a novice you may not have all the information you need to make an informed purchase.
The extra bits you may need

As a quick run-down of what you may need if you have a guitar and nothing else, I am going to quick-fire what you should buy and a few notes to help you make your decisions... Of course, use your best judgement, an acoustic without any sort of electronics in it will not need amps/leads!
- Amp - If you didn't get one as a kit with your guitar and want something affordable look at a little practice amp - look around 15 watts for a nice balance between sound and affordability. Try to get one with 2-channels so you can play both clean and heavier tones, and if you can get a built-in reverb too (and any other effects you can net) then that is a bonus. Feel free to go bigger, but if you have no intention of playing outside your room then you may not need the extra wattage.
- Leads - a lead is a lead is a lead, so pick a colour you like and don't think any more about it. More expensive ones may be more robust but you aren't gigging just yet and an affordable lead should last a long time as you sit in your house playing
- Plectrums (or picks) - As you are new, either go into a guitar shop and grab one of every variety or order an assorted set online. Play with many thicknesses and brands to see what you like
- Tuner - a little clip-on tuner will do fine, having a pedal tuner can be even better but as a beginner don't worry about having pedals just yet
- A strap - being able to play standing up is a nice option to have and if you have dreams of standing on stage one day you will need one of these. If you do decide to use a strap, get strap-locks to avoid the unnecessary heartache of accidental drops...
For now, don't worry about anything else, you should be ready to play. There is a whole wonderful world of effects pedals and accessories
Starting to play: the very basics
Set your guitar on your lap, or mount it to your strap so you can stand, set it up so it is comfortable and we can finally begin preparing to play. One hand sits on the fretboard, and the other sits just over the pickups holding a plectrum or pick - you will need to decide which is which based on your handedness and whether you purchased a left, or right-handed guitar. Where you pick can have some impact in the kind of sound your guitar produces, so try moving your picking-hand around over the pick-ups to see where feels comfortable and sounds good. Plug your amp in and connect it to your guitar, your amp may have a bunch of different controls on it and as amps come in all shapes and sizes I cannot offer any direct guidance other than to just play with the dials until it makes a sound you are happy with. Depending on the amp you may have controls like bass, mids and trebles which impact the tone of the guitar itself, channel volume and master volume which control loudness and a drive control which affects how overdriven the noise will be - honestly, understanding this as I explain it to you is worthless just take some time to make some noises and find one you like.
Have a play picking notes on individual strings and strumming over multiple strings, let your thumb move around the back of the neck until you find where it is comfortable, and know that the thumb shouldn't be rigid in place - it is free to move up and down to allow your fingers to stretch as needed, let it move so its where it wants to be whether that means it pokes over the top of the neck or sits much lower down.
I will be referencing your strings on standard tuning, working from low to high that is EADGBe - for simplicities sake, I will be referring to the two E's as low and high E respectively. You should also number your fingers! You generally don't use your thumb, but your fingers should be numbered 1-4 with 1 being the finger closest to your thumb and 4 being your little finger - this becomes especially important when playing chords because there is generally a 'correct' way to hold your hand and this is done because it is usually the most comfortable method and allows for the best position to transition into other chords which I will touch on below when we talk about chords.
Starting to play: reading tablature
To learn I am going to introduce you to tablature, or tabs, a method of transcribing music into an easy to read form - this is not musical notation and if you want to learn more about why I think tablature is a good starting point you can read more at the end in the music theory and teachers section. Tablature is a grid of lines to represent the 6 (or more) strings (the bottom line represents your low-E, the string closest to you) of a guitar, with numbers indicating which fret you should put your finger on - The frets start at 0 (an open note where you don't put your finger on the fretboard at all, just pick the string with your plectrum) and count upwards with your inlay markers working as a quick reference to your 3rd, 5th, 7th, 9th, 12th, 15th etc frets. Each vertical section in tablature represents an individual note, so if you have a single number on a single string then you would just pick that string, if you have multiple numbers across multiple strings then you would strum all of them together. I often see people say that tablature feels 'upside-down' when first starting but it does make sense relative to how you actually look at the fretboard - when playing you don't look at the guitar face on, you look down to it so the tab can almost overlay onto the strings from your perspective.

Tabs are available all over the internet, with the likes of Ultimate Guitar sporting an absolutely colossal back-catalogue of tablature for guitar, bass, drums, ukelele and so many more. Other notable examples include places like Songsterr which are absolutely loaded with features for playback and includes a slick UI for navigation and clean looking tablature.
For my examples, I will be using the type of plain-text tablature that has been passed around almost since the dawn on the internet. Tablature can be in a more fancy form, which I will include an example screenshot of below. For now, familiarise yourself with the below example:
e |------------|
B |------------|
G |----7-7-----|
D |----7---5---|
A |-5--5-----5-|
E |------------|
So to play the above:
- Plant your first finger on the A-string at the 5th fret and pick
- Leaving your first finger where it is, put your third finger on the 7th fret of the D-string and your 4th finger on the 7th fret of the G, then strum those three strings - this shape is called a power chord
- Now the next three notes are played individually and you may be tempted to play them using your first finger, but leaving your hand in the above shape means you can just pick the G-string, then the D-string then the A-string without having to move your fretting-hand
This may all seem like way too much too soon and you're already a little confused and your little finger doesn't feel like it works correctly - but don't worry! As long as you are understanding the concepts then that is all you should really be concerned about. The beauty of tablature is that with just that you understand enough to get started, but there are a handful of symbols that translate into techniques you need to be aware of that I will run through now...
Two important points before we go on to break-down the individual techniques, firstly tablature can be broken into sections or measures by repeating the vertical line - this can be useful if a section of the tablature needs to be repeated or to simply break the music up into logical groups. These measures can also be useful to know how fast to play and how long to hold notes for if the tablature specifies a BPM (which they often do not). Secondly, I have added bracketed numbers above the measures shown below for easier reference, these will not appear in normal tablature. So if you see something like the example below, the measure divide would have no impact on how the piece is played.
    (1)     (2)
e|-------|-------|
B|-------|-------|
G|-----7-|-7-----|
D|-----7-|---5---|
A|--5--5-|-----5-|
E|-------|-------|
Hammer-ons, Pull-offs and slides
These are probably the three of the most common techniques in songs, get ready to use these a lot as you learn various songs. These techniques all have one thing in common: the tablature may show two numbers to play, but you will only ever pick once. Let's draw tablature with all three of these laid out in a few common ways and breakdown how to play them:
    (1)   (2)   (3)   (4)   (5)  (6)
e |-----|-----|-----|-----|-----|----|
B |-----|-----|-----|-----|-----|----|
G |-----|-----|-----|-----|-----|----|
D |-----|-----|-----|-----|-----|----|
A |-5h7-|-7p5-|-5/7-|-7\5-|-/7--|-5\-|
E |-----|-----|-----|-----|-----|----|
You may have figured this out already, but h stands for hammer-on and p stands for pull-off with the slashes (/ \) indicating a slide in different directions; for the above example we first have a hammer-on, then a pull-off and then four slides. To make things a little easier for you, hammer-ons and pull-offs are in essence the same things in different directions so let us break those down first.
As I mentioned previously, we will only be picking one note for each of these, so let's bear that in mind as we go into the first example (1) of the hammer-on:
- Put your first finger on the A-string at the 5th fret and pick just that string
- Without picking, put your third finger on the 7th fret of the A-string. You may need to use a little force (imagine your finger as a little hammer) to get a clean note to ring out (a clean note is one that is nice and loud with no buzzing or other strings ringing out in error)
A pull-off works very much the same, but you have to have the second note ready to go to so it can be pulled off to, so to pull off the pull-off shown in the second section (2) above:
- On the A-string, put your third finger on the 7th fret AND put your first finger on the 5th fret. Pick that string and you should have the 7th fret ringing out cleanly
- Without picking, pull your third finger away from the 7th fret - the note should naturally transition to the 5th fret. You may need to flick your finger slightly to get a clean note to ring out
Hopefully nothing too complicated so far and slides shouldn't give you too much grief - I feel the name here is the most self-explanatory, you pick at one fret and then you slide your finger to the next fret. The slash denotes the direction, but in these examples where two notes are specified it is pretty simple to figure out which direction to, for our first example (3):
- Place your first finger on the 5th fret of the A-string. Pick that string
- In a smooth motion, slide your finger from the 5th fret up the string until you reach the 7th fret where you should stop
Nothing more to it, for the next one (4) just reverse the process: start at the 7th fret and slide down until you reach the 5th then stop - simple!
The last two slides are interesting because they do not specify where to slide from (5) or where to slide to (6), in the previous examples you can hear two distinct notes being played with a slide in between because you pause on them slightly to let them ring out, but for this, we only want to hear the sliding sound and one distinct sound. So with our first example (5), we need to slide up to the 7th fret:
- Place your finger on any fret lower than the 7th fret on the A-string. You will need to judge where to start based on the sound you are trying to replicate, if its a long sliding noise start lower on the fretboard, if its a quick and short sound, start higher. The forward slash denotes that we slide up to the 7th fret, so the highest you should start from is the 6th fret.
- Start to slide your finger up the fretboard, then pick the string. There shouldn't be a distinct note played, it should go straight into the sliding sound you could hear in the previous exercise in between notes
- Stop at the 7th fret
Our last example (6) is a 5th fret that slides out,
- Place your finger on the A-string, 5th fret. Pick the string and allow it to ring out for as long as needed
- Slide your finger down the fretboard, again you will need to judge how long for to create the sound you are looking for
- We don't want to stop on any particular note, so you can take your finger off the fretboard after the slide is done without stopping anywhere. You need to let your finger off slowly to mute the string and stop it from ringing-out, otherwise, you will just do a pull-off to an open-string (0 in tablature terms). You can also use your picking-hand to gently mute the note with your palm to stop it ringing
Sidenote: trills
Trills are just hammer-ons and pull-offs in rapid succession, so if you see the following in tablature:
e |-------|
B |-8tr10-|
G |-------|
D |-------|
A |-------|
E |-------|Then this represents:
e |---------------------------|
B |-8h10p8h10p8h10p8... (etc)-|
G |---------------------------|
D |---------------------------|
A |---------------------------|
E |---------------------------|
Bends

I wanted to look at bends separately because there are a few different ways to write bends and they can mean different things, here are a few examples of how they may be expressed:
   (1)   (2)   (3)     (4)
e |----|-----|------|-------|
B |----|-----|------|-------|
G |-8b-|-8br-|-8b10-|-8b9r8-|
D |----|-----|------|-------|
A |----|-----|------|-------|
E |----|-----|------|-------|I will be grouping these accordingly to how they are played but the one thing they all have in common is you should only pick once for all of these bends. Let's look at the first two examples and see how they should be played. Firstly we have a simple bend (1) denoted by the letter b, to do a bend we:
- Place your first* finger at the G-string on the 8th Fret, pick the note
- Bend the string upwards or downwards, whichever is more comfortable as the end result will be the same
In our second example (2), we have a bend and release, which is played as follows:
- Place your first* finger at the G-string on the 8th Fret, pick the note
- Bend the string upwards or downwards
- Allow the string to return to its starting point to 'release' the bend
* in both of these examples, I have suggested using your first finger to play these notes, however, players are often more comfortable using their second finger (or even third finger) to bend so they can use their first finger to 'support' the bend - play around and see what feels more comfortable to you.
Now in both of the above examples, you may have noticed that there is a crucial piece of information missing: I said to bend, but how far is a 'bend'? The truth is it varies depending on the desired end result but most bends are either a 'half-step' or 'whole-step' bend. There is an easy way to measure these bends, a half-step bend will produce the sound equivalent to 1 fret higher, and a full-step bend will produce the sound equivalent to 2 steps higher. So to practice these using example (1):
- Pick the 10th fret, then move back to the 8th fret, pick, and bend until it sounds like the 10th fret. This is a full-step bend
- Pick the 9th fret, then move back to the 8th fret, and bend until it sounds like the 9th fret. This is a half-step bend
Unfortunately, if the tab does not specify how far to bend you will just need to use your best judgement based on what you can hear- but in our examples (3) and (4) you can see bends that specify where to bend to. (3) is telling you to do a full-step bend as discussed previously, and (4) is telling you to do a half-step bend and then release it. Bends are a surprisingly difficult thing to master, especially when placed within a fast sequence of notes, sure it is easy to do the bending motion but to hit the bend pitch-perfect every time is no mean feat.
Vibrato
Vibrato is the act of gently vibrating the string to produce an almost wobbly note that can really make the difference in your overall sound. Think of it as ever-so-gently and repeatedly bending and releasing the note a tiny amount, this is another one of those techniques that is difficult to master but is worth practising as good vibrato can really make your playing sound slick and professional (just don't overdo it!). It can be as subtle as just rocking your finger back and forwards on a string to a more prominent bending motion, so have fun experimenting with this to see what you prefer.
e |----|----|
B |-5~-|-5v-|
G |----|----|
D |----|----|
A |----|----|
E |----|----|
Note: these are both examples of vibrato and there is no difference in how they are played.
Palm mutes and dead notes
These are two techniques that don't really go together except for one key point: You can tell your palm mutes are wrong if they start to sound like dead notes. Here is both in tablature:
    (1)      (2)
e|-x-x-x-|---------|
B|-x-x-x-|---------|
G|-x-x-x-|---------|
D|-x-x-x-|---------|
A|-x-x-x-|---------|
E|-x-x-x-|-0-3-2-1-|
PM         . . . .
Our first example (1), is dead notes, dead notes can be played anywhere along the fretboard (usually wherever is convenient relative to what you are playing). All you need to do is rest your fingers, ideally at least 2, gently on the strings over the fretboard - not enough to produce a fretted note, just enough so you stop the string from ringing out and instead produce a more scratchy-thunk of a sound. I recommend using multiple fingers to produce this sound as using a single finger is likely to result in a harmonic accidentally being played, which I will talk about more in the harmonics section.

Palm mutes are shown either below or above the tablature, either like in our example with the dots to represent where to palm mute or with little PM symbols shown all the way along in place of the dots. Palm mutes are a picking-hand technique, you need to gently rest the edge of your palm on the strings near the bridge and then play the notes as normal. Experiment with where your palm needs to sit, too far up the strings and you will completely mute them resulting in a sound much closer to dead notes and too far over the bridge and you won't mute the notes at all.
Fingerpicking, Octave chords and chords with dead notes mixed in
Sometimes you may notice gaps in notes that seem illogical as the tablature jump strings magically - these instances are typically representative of fingerpicking. Fingerpicking is exactly what it sounds like, some or all of the strings you will need to pick need to be done with your fingers. Depending on what the song calls for you can either put the pick away and fingerpick everything or keep the pick in your hand and use your free fingers, such as your little fingers, to pick the extra notes.
   (1) (2)
e |---|---|
B |---|---|
G |---|---|
D |-7-|-7-|
A |---|-x-|
E |-5-|-5-|Example (1) shows a piece that would need to be fingerpicked, and you can do it one of two ways, firstly, use your fretting-hand and place your first finger on the low-E-string, 5th fret. Then use your third finger on the D-string 7th fret. Then you can either:
- Put your pick above the low-E-string, then put either your third or fourth finger just below the D-string. As you pick downwards, pull your other finger upwards to pick both notes at the same time
- With your picking hand not holding a pick, place your thumb above the low-E string and either your second or third finger just below the D-string. As your thumb moves downwards, bring your other finger upwards to pick both notes at the same time
Experiment with finger choice and direction to find the most comfortable way of doing this.

Example 2 has a dead note in between, so it can be strummed like a normal chord by picking all 3 strings together, however, you will need to mute that string in between somehow. Usually, I use my first finger that is fretting the low-E-string, by allowing it to sit a little flat so it just touches the next string down it should mute it perfectly, however, nothing is stopping you from using your second finger to do this job.
A few other pieces you may need
The above techniques are probably enough to keep you going but there are others that are worth being aware of for when they do appear in tablature, So let's lay these out in tablature form and run through them one by one, I would argue that some of these may be a little beyond what you want to be trying in your early days but if you want to give it a shot then you may as well be prepared!
    (1)    (2)     (3)      (4)
e |-----|------|--------|--------|
B |-12*-|-<12>-|--------|--------|
G |-----|------|-12-----|-12t----|
D |-----|------|------5-|------5-|
A |-----|------|----3---|----3---|
E |-----|------|--------|--------|
So in both sections (1) and (2), we have examples of harmonics - the first is a pinch harmonic and the second is a natural harmonic. For the pinch harmonic (1) get your finger in place on the 12th fret of the B-string, this technique is all in our picking-hand, as you pick the string you need to catch the string with your thumb - this is a very precise technique that can take a while to feel out, it will also matter where on the string you are picking as different spots give different harmonics and some give no harmonic at all. If you manage to pull one off you should get a squealing higher pitched note than you would typically get at that fret that pairs well with vibrato. Natural harmonics (2) are thankfully considerably easier, remember earlier when I said I recommended using more than one finger for dead notes or you would end up with a harmonic? Well, this is a natural harmonic, place your finger over the 12th fret of the B-string but do not press fully, in fact, you need a fairly light touch, and pick - the result should be a high pitched ringing note.

(3) and (4) are identical techniques, but I wanted to draw your attention to something I often see omitted from tablature - notice how in example (3) you are forced to jump from the 12th fret on the G-string all the way to the 3rd fret of the A-string? That's a bit of a stretch for even the biggest fingered players out there, but example (4) explains why - you are meant to 'tap' the 12th fret. Tapping is a picking-hand technique that brings your picking-hand onto the fretboard to manually tap some notes, for this you will not be picking in the traditional sense although you can use the edge of the pick to tap if you prefer that. To play both examples above (3 &4):
- Take your picking-hand and using your first finger, tap the G-string at the 12th fret. You may need to strike with a little bit of force to get a clean note.
- With your fretting-hand, use your first finger to tap the 3rd fret of the A-string
- Again with your fretting-hand, use your third finger to tap the 5th fret of the D-string
Getting the notes to ring out cleanly when tapping is the biggest challenge because, of course, you do not have the assistance of the pick to get a nice loud note out but I am sure with some practice you can master this technique!
Help - my tablature is full of gibberish!
If you are not recognising any of the symbols in the piece of music you are trying to play, then either you have stumbled onto a song that uses a lot of different techniques not listed here or more likely someone has used their own symbol notation for their song. Hopefully, the tablature comes with a key that breaks down what everything means but if not you may have to contact the tab-writer to try to find out what symbol means what. There is unfortunately not an easy way around this, and in my time learning from tablature I have seen a lot of...interesting choices for alternative symbols. Google is always your friend in this, so you can quickly get onto searching to see if it is just a technique not listed here.
Onto Chords
 Chords are often features of tablature but may also be written out as a chord diagram - these are different from tablature as they are usually orientated vertically and directly represent frets. The above example shows a G, D and F chord - here is an example of a G-chord in plain-text:
 (1)       (2)
______    ______
||||||    ||||||
|o|||| or |1||||
o|||oo    2|||34
||||||    ||||||
These two diagrams represent the same thing, the top horizontal line represents the nut of the guitar (unless specified otherwise - sometimes it may have a label to show it starts at a specific fret) and each section of vertical lines is a different fret. The difference here between the two examples is the (1) shows where to put your fingers whereas (2) shows which specific finger to put in which place - following the guidance on where to place your fingers is recommended for the reasons I mentioned previously, it is usually the most comfortable position and the easiest to transition from and to other chords. Either way, both of these would translate into tabs as:
e |-3-|
B |-3-|
G |-0-|
D |-0-|
A |-2-|
E |-3-|
The G-chord uses every string when playing, however, other chords may not in tablature this is obviously shown by the absence of any number, but with chord diagrams, there will be an x either above the nut line or on it to show this string should not be played. There are a lot of chords, and often a lot of ways to play the same chord, so I am not going to list off many here - there are plenty of libraries full of chord diagrams and most tab websites will include chord diagrams at the top of their song listings so you don't even have to look elsewhere to get the information you need.
This method is often preferred when transcribing acoustic songs, or any song heavy in traditional chords because they can show the chord change positions relative to lyrics easily:
                        G
here is line one of a song,
                            C
and here is line two of a song,

...
We can see that we need to switch to a G chord at the end of the first line, then switch to a C chord at the end of the second line without having to write:
e |-3-3-3-3-3-3-|
B |-3-3-3-3-3-3-|
G |-0-0-0-0-0-0-|
D |-0-0-0-0-0-0-| etc...
A |-2-2-2-2-2-2-|
E |-3-3-3-3-3-3-|

Some song transcribers will include a strumming pattern with chords, that tells you when to strum up or down relative to the tempo of the song, it may look something like this:
 ↓   ↓ ↑ ↓ ↑
 1 & 2 & 3 &
 └─┘ └─┘ └─┘
I know you may not be familiar enough to recognise a songs count yet but now is as good a time as any to practice and you will probably be surprised how quickly you can figure this out - if you have ever tapped along to a song you were almost certainly following its beat. As an added aide, a lot of tabbing and chord website will have a feature so you can hear the strumming pattern played to you first so you know what to do. The strumming pattern here would be played by:
- Place your fretting-hand into position and strum the chord downwards - that is, start with your pick at the highest string and strum all the way to the lowest string
- On the beat of the song, do nothing for one beat
- Strum the chord downwards again
- Strum the chord upwards - that is, starting from the bottom string and run the pick across all string until you reach the highest string
- Strum the chord downwards again
- Strum the chord upwards again
Then your fretting hand would transition to the next chord while you repeat this strumming pattern - if there is a pattern change then the chord sheet should tell you. Before long you will have a glossary of chords starting to build up in the back of your mind!
A note on barre chords
A barre chord is a type of chord that requires you to fret all strings at a specific fret, to do this you must lay your first-finger flat across all strings and press them so you get a clean note. Most players dread barre chords when starting out, but they are not the insurmountable demon of guitar that a lot of players seem to make them out to be - they just require practice! You are basically asking your fingers to do things they are not used to and when you first start out they probably are not up to the task and in a lot of ways simply lack the strength to do certain tasks. So when you take on your first barre chord, you feel clumsy and like you have to press with all your might just to get a clear sound.
Make barre chords something you practice often, even if you just play a few in every play session, and you will soon realise just how quickly your hands can adapt. If I can give any advice I would say practising transitions into and out of barre chords is the biggest part so just sitting there strumming barre chords is only going to get you so far, and you should try shuffling your first finger around until you find the comfortable position that gives you the sound you need - it is not always about pushing harder! Another thing to consider when playing barre chords is, especially if you are on a cheaper guitar, is the set-up holding you back? I have played some poorly set-up guitars with a ludicrously high action that makes barre chords such a chore to play and other guitars set up perfectly that make such chords effortless; all this means is what I mentioned above, make sure your guitar is set-up before you get playing so it doesn't hold you back!
General advice for a beginner
I hope you feel nice and prepared to get started with your guitar, you understand tabs and know what you are doing when it comes to chords - but what comes next? Well, a lot of practice comes next, but if I can offer any advice then here is a few useful tips...
Practising for 10 minutes a day is better than for 1 hour, once a week. Muscle memory plays a huge part of playing the guitar, to the point where I often cannot explain how to play a song without having a guitar in my hands. Even if you only pick up a guitar and play through a few things you learnt recently and put it straight back down, it is better than leaving it a week between sessions. That said, the more you can play the better - if you want to put in an hours session every day then go for it!
This is one of the hardest things to practice early on but get your little finger working! Most new players I encounter can easily get their second and third fingers involved without too much hardship but the little finger just does not want to jam with the rest of the band. This can only be fixed by practising, I recommend starting with songs chock-full of power chords, where your little finger has to fret the last note of power chords so it cannot skip out. Once you are used to this branch out into more songs that have more technical requirements for your little finger.
There are many weird and wonderful sounds that can come out of a guitar, so I recommend broadening your playing horizons by playing as many different genres and styles of music as possible. There is not too much more to say here, other than your typical blues guitarist will handle a guitar very differently from a Djent God but there are things to be learnt from both.
The earliest parts of learning to play the guitar are meant to be about having fun, but you are inexperienced and may actually lack the skill to play things (at least for now), so with that in mind when it stops being fun it is time to give it a break. Whether that means putting the guitar down and coming back to it later, or simply giving up on learning a song until you are a bit more experienced then you should absolutely do that - learning to play is a marathon, not a sprint and you have plenty of time to master everything you want to. Some things will always take longer than others...
Should I go to a teacher and what is this thing called 'music theory'
Okay, so I have rabbited on for a good long while about learning to read tablature and not once made mention of a music teacher - does this mean I think they're not worth it? Quite the opposite, and this ties into another important part of playing the guitar which is music theory. So my goal here is to get you excited about learning guitar, getting into it can be the toughest hurdle because it is easy to lose interest and in my experience, the best way to see quick progress is by learning your favourite songs via tablature. You can go from not being able to do anything to quickly being able to play several songs, or parts of songs, which gives you something to show for your work. The problem with music theory is it can be a little dry and downright boring at times for a new player and can often result in them losing all enthusiasm before they realise the power of music theory.
Music theory is incredibly important in becoming a well-rounded guitarist but its difficult to see that from the perspective of a beginner. For now, focus on learning some songs via tablature and get all enthused about the guitar - once you have stuck with a while start taking on music theory (and consider getting a teacher if this is the best way for you to learn, needing a teacher is down personal preference). You will learn how to do a lot of things but music theory is the key to understanding why certain things are the way they are. Finally, have you ever seen someone sit down with a guitar and effortlessly start plucking awe-inspiring solos that can match any backing track or jam session? There is no magic happening there, it is all in understanding and applying that music theory, knowing scales and how to switch key effectively - with practice and a little determination this could one day be you.
FAQ
What should I be learning as a new player? Should I try to learn full songs? Should I learn a lot of things or focus on getting one song right?
In my opinion, as a new player, you should bounce around as much as possible - so with that in mind, I would learn riffs rather than songs. Master your favourite riff from your most loved song and then move onto the next! You have plenty of time to come back and fill in the gaps later when you are more experienced, but there is nothing worse than a song that has a killer intro that's fun to play but also has a technical and frustrating bridge that saps all the fun out of it. However, do whatever seems the most fun to you and what makes you more likely to keep picking the guitar back up
What songs should I start with?
The honest answer is - whatever gets you excited! I can certainly recommend songs that agree with most people, such as White Stripes - Seven nation army, Deep Purple - Smoke on the Water, Come as you are - Nirvana or a litter of other easy-but-fun tunes but if they do not resonate with you then there is no point. Pick a genre you love and get to searching "Easy <genre name> songs to learn on guitar" and start from there.
My fingers hurt.
That's not a question, but it is normal. Your fingers need to develop calluses to protect them against the strings, as a new player this can take a few weeks. Let your fingers rest if they start really hurting but otherwise just ignore it. By the time you've been playing a month painful fingers will be a distant memory.
My wrists hurt.
Maybe not as common as the fingers hurting but still something I hear a lot and it does seem to impact many players in their early days. Try to pay attention to your wrist angle while playing and make sure you are not sitting rigidly, everything should be relaxed and not all uptight. If you are doing everything right then it could just be your wrist muscles developing so allow it to rest for a few days before picking a guitar back up, or play in short bursts if you really can't help yourself. Much like finger pain, as long as you aren't sitting especially uncomfortably it should go away as your body adjusts to the new challenges it is facing.
I have been struggling with this song, any pointers?
There is, unfortunately, nothing you can do other than practice and like I said previously if you find yourself getting frustrated move onto something else for now.
I keep trying to play barre chords but I can't get all of the strings to ring cleanly and one keeps buzzing/sounding dead - help me!?
First things first, figure out which string is buzzing and make sure the string itself isn't buzzing! Play just that string in the same place it needs to be played for the barre chord. If you rule out fret buzz, then all you can do is practice, practice, practice!
Any pointers on getting faster?
Make sure you are practising both up and down picking - otherwise just practice makes perfect.
There is this part in a song I love labelled 'sweep picking' - what is that?
Sweep picking is almost certainly too advanced a technique for someone reading this, but I will cover it briefly for the benefit of the curious. To sweep pick, your picking-hand typically runs up and down the strings only sticking them once (save for the first and last string which you may strike twice). While that is happening your fretting hand is doing all the hard-work, usually by combining hammer-ons and pull-offs to make a smooth sequence of clear notes. The art of sweep picking is getting your hands synchronised when moving that fast, something that is really difficult to do in your early days of playing.
As a true beginner player, I would consider sweep picking something to come back to, but the answer to figuring it out is to practice it - A LOT. Try sweep picking across 3 strings, to begin with, while making sure every note comes out without any dead notes or errant strings being caught by your picking hand. Once you are happy with this, add in another string and work your way up. Practice until you hate the sound of sweep picking, and then practice some more.
There's this one song that...
PRACTICE! The answer is always practice. Anything you are struggling with, anything that doesn't quite sound right, you can guarantee your best bet is to keep doing it until you hate it. I have songs I learnt on guitar and then never listened to again- I just couldn't face hearing them again, after listening to the song none stop for days straight to nail the complicated parts! I think that is the best point to end on, I wish you good luck on your journey to rock god and encourage you to practice as much as you are physically able to.
